Metal roofs last an impressive 50 to 70 years, making learning how to install a metal roof a valuable skill for homeowners seeking long-term solutions. While traditional asphalt shingles need replacement every 15-20 years, metal roofing stands the test of time against extreme weather conditions, including hurricanes and hail.
Although the initial cost of metal roofing can be two to three times higher than asphalt alternatives, proper installation can save homeowners thousands in future repairs and replacements. Additionally, these durable roofs contribute to lower energy bills through heat reflection and require minimal maintenance, as they resist moss and mold growth.
Thinking about upgrading to a sleek, durable metal roof? You’re in the right place! This guide breaks down everything from picking the perfect materials to locking in the final panel. Whether you’re tackling a full installation or just want to understand the basics, we’ve got you covered for a smooth and successful roofing project.
Why Install a Metal Roof Yourself
Tackling a metal roof panel installation project independently offers substantial financial benefits for homeowners. Additionally, understanding how to install a metal roof requires not only careful consideration of costs but also skills and time investment.
Cost savings breakdown
The financial advantages of DIY metal roof installation are significant. Specifically, homeowners can save between $3,400 and $10,500 on labor costs alone. Moreover, professional installation typically accounts for 60-70% of the total roof cost. For instance, on a standard 1,700-square-foot roof, material costs range from $1 to $25 per square foot. Furthermore, professional labor adds another $2 to $14 per square foot.
In contrast, a complete metal roof installation, when done professionally, costs between $16.93 and $22.81 per square foot as of January 2025. Therefore, learning how to install a metal roof not only helps save money but also allows homeowners to redirect these funds toward higher-quality materials or other home improvements.
Required skills and experience
Successfully completing a step by step metal roof installation demands specific competencies. Essential skills include:
- Basic carpentry knowledge for accurate measurements and secure attachments
- Physical strength and endurance for handling materials
- Precise attention to detail for proper panel alignment
- Understanding of local building codes and safety regulations
Before starting a metal roofing how to project, homeowners should possess experience with power tools and basic construction principles. The installation process requires specialized tools beyond standard hardware store equipment. Furthermore, proper installation demands understanding various roofing systems, sealants, flashing materials, and insulation types.
Time commitment needed
The duration of a metal roof installation varies based on several factors. For DIY installations, expect the project to take 5-7 full days. Subsequently, certain elements can extend this timeline:
- Complex roof designs with multiple valleys slow progress
- Numerous roof vents require additional attention
- Weather conditions affect working speed
- Underlying structural issues may need addressing
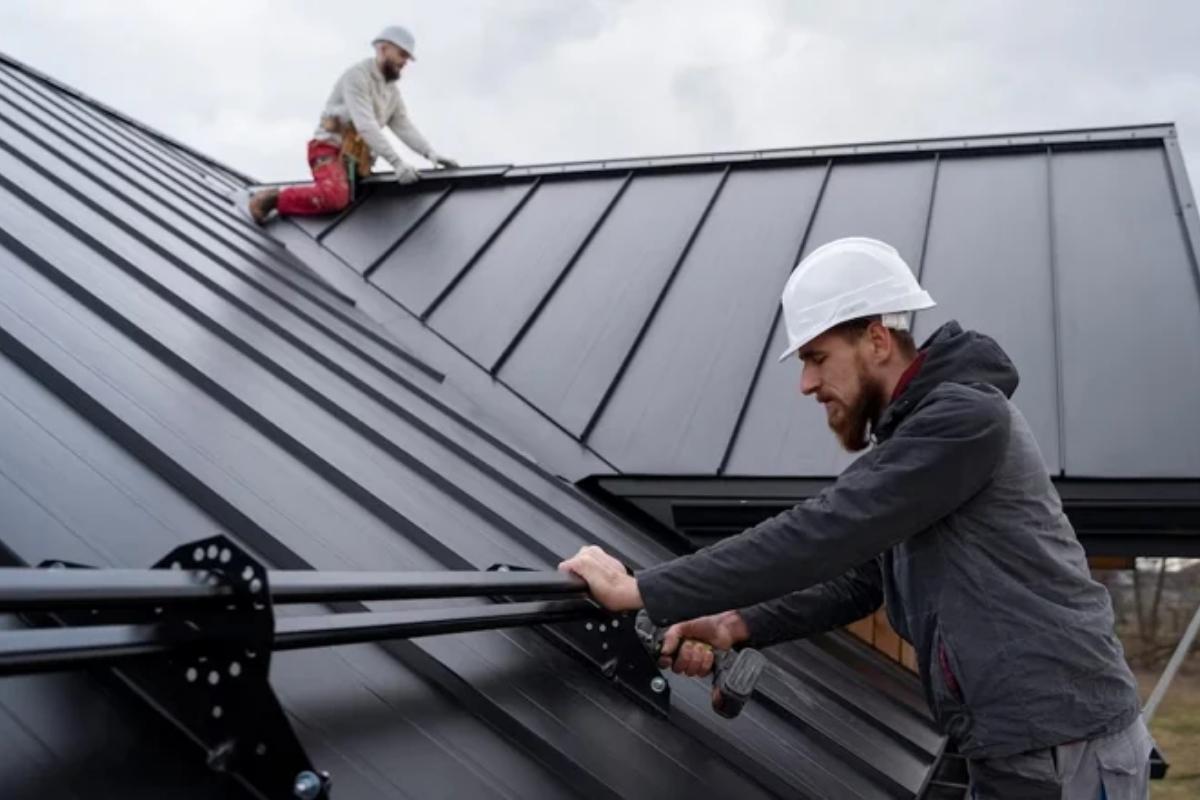
Professional teams typically complete installations in 1-3 days. However, DIY installers should plan for longer durations because working alone makes handling long metal panels more challenging. Furthermore, single-person installations face particular difficulties with wind conditions and panel manipulation.
To begin with, understanding how to install a metal roof properly requires methodical attention to each phase. Specifically, the process involves measuring accurately, removing old roofing, preparing surfaces, cutting panels precisely, and ensuring proper sealing at every junction. As a result, rushing through any stage risks compromising the roof’s integrity.
Additionally, first-time DIY installers should note that metal roof panel installation demands more precision than traditional shingle roofing. Even minor gaps or misalignments can lead to moisture problems. Therefore, thorough preparation and careful execution are essential for achieving professional-quality results.
Essential Tools and Materials
Success in learning how to install a metal roof largely depends on having the right tools and materials at hand. Furthermore, a well-planned toolkit not only ensures efficient installation but also helps maintain safety throughout the project.
Basic tool checklist
For proper metal roof panel installation, essential tools include:
- Aviation snips for precise metal cutting
- Hand seamer for bending angles
- Metal shears with swivel head capability
- Drill/driver with appropriate bits
- Measuring equipment including tape measure and speed squares
Specialized fastening tools, therefore, make a significant difference in installation efficiency. Moreover, a cordless impact driver is particularly useful for larger projects, as it reduces hand fatigue during extended fastening work. Additionally, for cutting operations, electric swivel head metal shears, priced around $200, offer superior control across corrugations.
Safety equipment requirements
Safety gear stands as a crucial component in how to install a metal roof properly. Key safety items include:
- Full-body harness with secure anchor points
- Personal fall arrest systems (PFAS)
- Hard hats and protective eyewear
- Cut-resistant gloves
- Anti-slip footwear
The investment in safety equipment typically ranges between $345-925, encompassing essential protective gear. A safety harness and fall protection kit costs $50-150, alongside rope grabs priced similarly for vertical movement security.
Material quantity calculator
Accurate material estimation remains vital for step by step metal roof installation. Consider these factors:
- Calculate total roof square footage
- Add 10% extra for waste allowance
- Account for overlaps and trim pieces
Metal roofing materials sell by the square (100 square feet), making precise measurements crucial. Online calculators assist in determining exact quantities based on:
- Building length and width
- Roof pitch measurements
- Panel coverage specifications
For complex roofs featuring multiple peaks and sections, measure each plane individually then combine measurements for total square footage. This approach ensures accurate material ordering and minimizes waste.
The material estimation process should factor in:
- Panel profile specifications
- Roof coverage requirements
- Waste factor considerations
A metal roofing how to project requires careful attention to supplementary materials, including:
- Ice and water shield underlayment
- Roofing nails and self-tapping screws
- Eave and gable trim pieces
- Ridge caps and sidewall flashing
- Metal roofing sealant
- Foam closure strips
- Butyl tape
Proper planning through material calculators helps prevent costly overages or shortages during installation. Moreover, first-time installers often benefit from utilizing specialized roofing software. In addition, this software provides synchronized counts and customized layouts for eaves, ridges, and valleys.
Step by Step Metal Roof Installation Guide
A successful metal roof installation requires meticulous attention to detail at each stage. To begin with, learning how to install a metal roof starts with proper preparation. Furthermore, it follows a systematic approach through to completion.
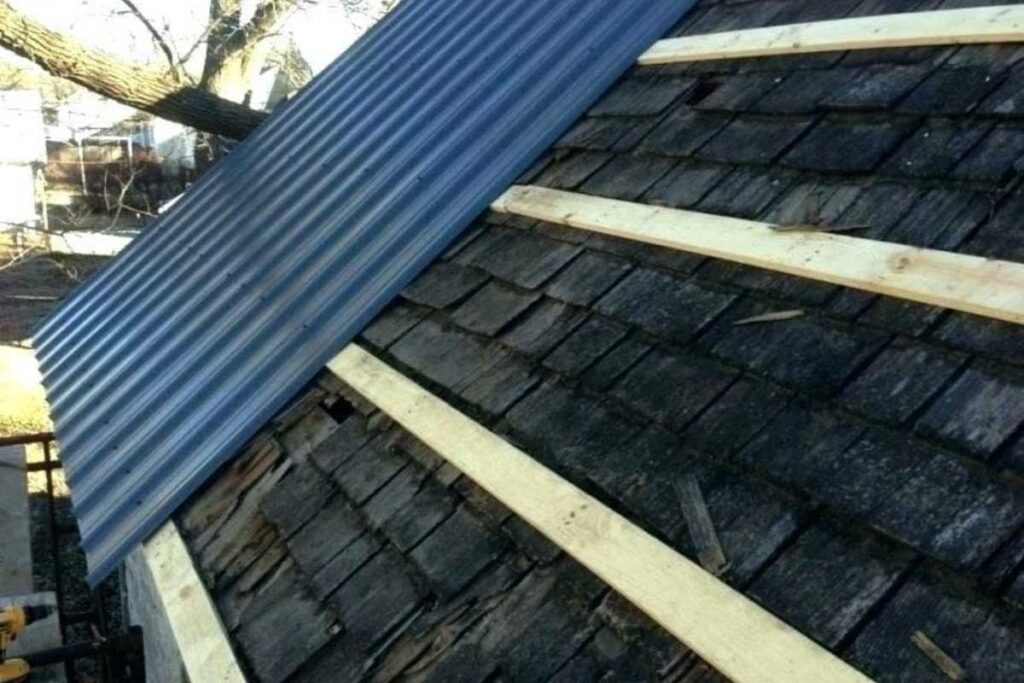
Removing old roofing
The first phase of metal roofing how to involves clearing the existing roof surface. A complete tear-off of old shingles allows thorough inspection of the underlying structure. After removal:
- Hammer down or extract protruding nails
- Inspect sheathing for damage
- Make necessary repairs with sealants
- Clear all debris from the roof surface
Installing underlayment
Installing a metal roof properly includes selecting appropriate underlayment materials. High-temperature rated synthetic underlayment offers superior protection compared to traditional tar paper. The installation process involves:
- Ensure the roof deck remains clean, smooth, plus dry
- Start at the eave edge, extending underlayment two feet inside exterior walls
- Unroll material across the roof while removing adhesive backing
- Overlap previous layers by 6-8 inches
- Cut flush at edges
For roofs with less than 3:12 pitch, cover the entire surface with ice and water shield. Underlayment installation requires careful attention to prevent wrinkles, as these affect the final appearance of metal panels.
Setting panels
The step by step metal roof installation continues with precise panel placement. Begin by:
- Positioning foam closure strips along the eave
- Applying butyl tape to secure strips
- Running sealant bead atop closure strips
- Setting panels with 1-inch eave overhang
Align each panel carefully, ensuring measurements from reference lines match at top and bottom. Metal roof panel installation demands attention to proper overlap between sheets, following manufacturer specifications for your chosen profile.
Securing fasteners
The final phase focuses on proper fastener installation, which proves crucial for a watertight seal. Key considerations include:
- Use self-drilling screws with rubber washers
- Install fasteners in panel flats, not ribs
- Space rows maximum 24 inches apart
- Place screws through foam closure strips at eaves
Proper torque remains essential – tighten screws until the washer spreads to the metal cap edge without overcompressing. Utilize specialized screw guns with adjustable clutch settings rather than standard drills or impact drivers.
A metal roof installation guide emphasizes the importance of straight screw lines. Employ chalk lines for precise fastener placement, plus clean lines afterward to prevent staining. Avoid angled screw installation, as this compromises the seal integrity.
Common Installation Mistakes
Even experienced contractors face challenges when learning how to install a metal roof. Knowing common pitfalls helps homeowners avoid costly mistakes and ensure a durable installation.
Panel alignment errors
Proper alignment stands as the foundation of metal roof panel installation. Inexperienced installers often overlook the critical importance of substrate preparation. The underlying material must maintain proper alignment prior to panel placement. Misaligned panels create both esthetic and functional problems:
- Panels accentuate substructure errors, resulting in unattractive rippling effects
- Improper engagement between panels compromises weather resistance
- Structural variances become more noticeable as installation progresses
A metal roofing how to project demands frequent alignment checks throughout installation. Installers should verify both vertical and horizontal alignment along panel edges. Using levels, laser guides, or string lines helps measure any deviations from the proper plane.
The preferred tolerance remains convex (outward) rather than concave (inward). Step by step metal roof installation requires checking panels for:
- Surface irregularities from handling
- Proper engagement with steel substrate
- Consistent spacing between panels
- Even overhangs at eaves and rakes
Incorrect fastener placement
Understanding how to install a metal roof includes mastering proper fastener techniques. Incorrect fastener installation ranks among the primary causes of roof leaks. Common fastening mistakes include:
- Overtightening screws
- Overcompresses or breaks the washer seal
- Creates stress points in panels
- Leads to premature fastener failure
- Under-tightening screws
- Fails to create proper washer compression
- Allows water infiltration
- Results in loose panels during high winds
- Angled screw installation
- Prevents proper washer seating
- Compromises weather-tight seal
- Increases potential leak points
A metal roof installation guide emphasizes placing fasteners on panel crests or ribs rather than valleys. This placement prevents water pooling and ensures proper drainage. Fastener spacing varies based on wind exposure:
For mild wind areas:
- End purlins: Every other rib horizontally
- Middle purlins: Every second rib horizontally
- Overlaps: Evenly spaced along sheet length
For high wind areas:
- End purlins: Every rib horizontally
- Middle purlins: Every other rib horizontally
- Overlap requires double corrugation fastening
Proper installation demands manufacturer-specific fastener types and placement patterns. Moreover, using incorrect fasteners or deviating from recommended patterns not only voids warranties but also compromises roof integrity. Therefore, first-time installers should specifically note that thousands of screw penetrations require precise installation to prevent leaks.
Metal Roofing Panel Types
Selecting the right panel type stands as a crucial decision when learning how to install a metal roof. Different panel styles offer unique advantages based on climate, budget, and esthetic preferences.
Standing seam vs corrugated
Corrugated and standing seam panels represent the two most prevalent choices for metal roof panel installation. Specifically, standing seam roofs feature raised vertical seams that connect panels, creating a sleek appearance with hidden fasteners. Additionally, these panels typically measure between 12 to 18 inches in width.
On the other hand, corrugated panels showcase a distinctive wavy pattern that enhances structural strength. Moreover, these panels cost approximately 50% less than standing seam options. As a result, a metal roofing how-to project becomes significantly more straightforward with corrugated panels, as they require less specialized skills for installation.
Key differences between these styles include:
- Maintenance requirements: Standing seam systems need minimal upkeep, whereas corrugated roofs demand annual fastener inspections
- Material thickness: Standing seam uses 22-24 gage metal, while corrugated typically employs 26-29 gage materials
- Weather resistance: Standing seam offers superior protection against leaks due to concealed fasteners
Material comparison
Understanding how to install a metal roof properly involves choosing between various metal types. Five primary materials dominate the market:
- Galvalume steel: Combines steel core with aluminum coating, offering excellent corrosion resistance
- Aluminum: Ideal for coastal environments and high-rainfall regions
- Zinc: Features self-healing properties and environmental benefits
- Copper: Preferred for architectural projects requiring distinctive esthetics
- Stainless steel: Known for superior strength in specialty applications
Step by step metal roof installation varies based on material choice. Steel options typically require paint finishes with warranties ranging from 20 to 45 years. In contrast, aluminum provides natural corrosion resistance without additional coating requirements.
Climate considerations
Regional weather patterns significantly influence metal roof panel installation decisions. For northern regions experiencing extended winters:
- Darker colors enhance solar absorption, promoting faster snow melt
- Snow bars prevent dangerous roof avalanches
- Thicker metals like steel outperform in severe weather conditions
Southern locations demand different specifications:
- Light-colored panels reflect solar energy, reducing cooling costs by up to 30%
- Proper ventilation requires airspace between panels and deck
- Both soffit and ridge vents facilitate hot air circulation
Coastal environments, however, present unique challenges for a metal roofing how-to project. Fortunately, materials like galvanized steel, aluminum, and zinc excel in these settings by resisting humidity and saltwater exposure. Moreover, metal roofs demonstrate remarkable resilience against high winds, thus making them suitable for hurricane-prone regions.
For hot, dry climates, metal roofs with reflective coatings can decrease total power costs significantly. White metal roofs, in particular, reduce cooling expenses by nearly 30% through enhanced heat reflection. Nonetheless, these coatings require periodic reapplication to maintain effectiveness.
How To Install A Metal Roof Frequently Asked Questions
What are the key steps to install a metal roof?
The main steps include preparing the roof surface, removing old roofing, installing underlayment, setting metal panels, and securing fasteners. Moreover, proper planning, precise measurements, and attention to detail are crucial throughout the process. Consequently, following these steps carefully ensures a durable and well-installed roof.
How to install a metal roof over shingles?
To install a metal roof over shingles, first, check local building codes. Install a layer of underlayment or furring strips over the shingles to create a smooth surface. Then, secure the metal panels using screws, ensuring proper overlap and sealing to prevent leaks.
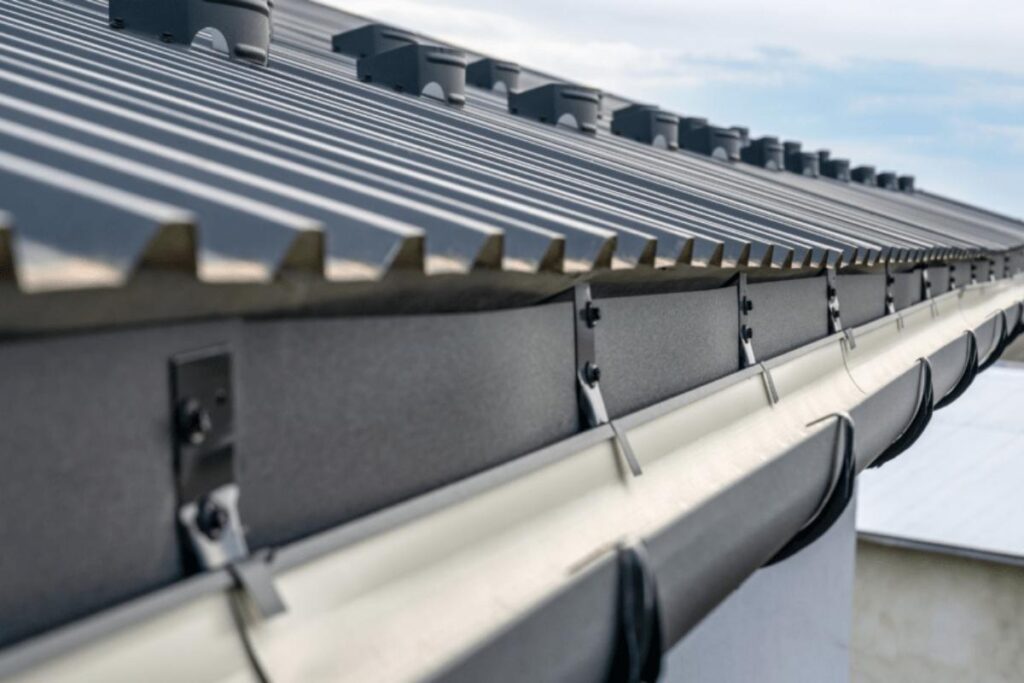
How to install gutters on a metal roof?
Attach gutter brackets to the fascia board, ensuring a low slope for proper drainage. Additionally, use a drip edge or gutter apron to direct water into the gutters. Next, secure the gutters with screws and seal the joints to prevent leaks. Furthermore, for metal roofs with large runoff, consider using wider gutters for better efficiency.
How to install a metal roof on a shed?
Start by installing a waterproof underlayment over the shed roof. Next, place metal panels from the bottom up, ensuring each sheet overlaps the previous one. Then, secure them with screws along the ridges, not the valleys, to prevent leaks. Finally, finish with ridge caps and flashing for a completely weatherproof seal.
How much does it cost to install a metal roof?
The cost varies based on materials and labor, typically ranging from $5,000 to $15,000 for an average home. Basic metal roofing costs $5 to $12 per square foot, while premium options like standing seam metal roofs can be more expensive.
What tools and materials are needed to install a metal roof?
To install a metal roof, you’ll need metal panels, roofing screws, a drill, a tape measure, metal snips, a chalk line, and sealant. Safety gear like gloves and a harness is also essential. Underlayment and flashing are required to ensure waterproofing and durability.
Can I install a metal roof over an existing roof?
Yes, metal roofs can often be installed over existing shingles if local building codes allow it. A layer of underlayment or furring strips is recommended for ventilation and moisture control. However, removing old shingles can prevent future structural issues.
How do I secure metal roofing panels properly?
Metal panels should be overlapped and securely fastened with roofing screws at the ridges and valleys. Additionally, screws must penetrate the framing or purlins, not just the sheathing. Furthermore, always use rubber-gasketed screws to prevent leaks and ensure a tight seal.
How do I maintain a metal roof after installation?
Regularly inspect for loose fasteners, rust, or debris buildup. Additionally, clean with mild detergent and water to prevent staining. Furthermore, check sealants and flashing around penetrations like vents and chimneys to ensure watertight protection over time.